Monday, 30 April 2012
Wednesday, 25 April 2012
Setting up FBA Claims in SharePoint 2010 with Active Directory Membership Provider
his is a walk-through on setting up FBA Claims in SharePoint 2010
using the Active Directory Membership Provider.
The very first
step is to create a web application AND create that with claims
authentication mode. I am going to provision a web application with
claims auth mode enabled at a URL http://moss.claims.contoso.com.

Another important section
in this “Create New Web Application” screen is the “Identity Providers”
section. Once we select the authentication mode to be claims, Windows
Authentication is also plugged in as one of the provider. Check the
“Enable Windows Authentication” check box if you’d like Windows
Authentication ALSO enabled for this web application.
We can
also choose to enable ASP.NET Membership and Role Provider here. In
this case, we’ll need to provide the corresponding provider names in the
text boxes. The web.config file entries can be added later.

Those are the important
parts. You can choose the other values as you’d normally would and
create the new web application.
Once the web application is
created, we’ll first configure this web application for claims
authentication using Active Directory Membership Provider and then
create a site collection.
There are 3 web.config files we need
to edit for enabling claims:
- The config file of the Central Administration site.
- The config file of the Web Application.
- The config file of the STS (SecurityTokenService) Application. This is important because it is this service that will ensure claims tokens are being passed correctly between the provider (in our case AD) and the consumer (CA and our Web Application). Further, we can have multiple providers plugged in. STS Application manages all of these interaction for us.
Central Administration web.config changes
Open
the web.config file of your SharePoint 2010 Central Administration site
and add the following entries (NOTE: The value you need to change
according to your environment are presented in red).
First the connection string:
<connectionStrings>
<add name="adconn"
connectionString="LDAP://anomaly.com/DC=anomaly,DC=com" />
</connectionStrings>
<add name="adconn"
connectionString="LDAP://anomaly.com/DC=anomaly,DC=com" />
</connectionStrings>
And then the provider:
<membership
defaultProvider="admembers">
<providers>
<add name="admembers"
type="System.Web.Security.ActiveDirectoryMembershipProvider, System.Web, Version=2.0.0.0, Culture=neutral, PublicKeyToken=b03f5f7f11d50a3a"
connectionStringName="adconn"
enableSearchMethods="true"
attributeMapUsername="sAMAccountName" />
</providers>
</membership>
<providers>
<add name="admembers"
type="System.Web.Security.ActiveDirectoryMembershipProvider, System.Web, Version=2.0.0.0, Culture=neutral, PublicKeyToken=b03f5f7f11d50a3a"
connectionStringName="adconn"
enableSearchMethods="true"
attributeMapUsername="sAMAccountName" />
</providers>
</membership>
NOTE: The
connection string element should be present outside of the
<system.web></system.web> section and the provider element
should be present within <system.web></system.web> section
of the web.config file.
After this change, the web.config file
of the Central Administration site should look like what’s shown in
Image3.
Web
Application web.config changes
Open the web.config file
of the newly created web application and add the following entries
First the connection string:
<connectionStrings>
<add name="adconn" connectionString=LDAP://anomaly.com/DC=anomaly,DC=com />
</connectionStrings>
<add name="adconn" connectionString=LDAP://anomaly.com/DC=anomaly,DC=com />
</connectionStrings>
NOTE: This
entry should be made outside of <system.web></system.web>
section in the web application’s web.config file. Just like the one for
Central Administration site.
And then the provider:
<membership
defaultProvider="admembers">
<providers>
<add name="admembers"
type="System.Web.Security.ActiveDirectoryMembershipProvider, System.Web, Version=2.0.0.0, Culture=neutral, PublicKeyToken=b03f5f7f11d50a3a"
connectionStringName="adconn"
enableSearchMethods="true"
attributeMapUsername="sAMAccountName" />
</providers>
</membership>
<providers>
<add name="admembers"
type="System.Web.Security.ActiveDirectoryMembershipProvider, System.Web, Version=2.0.0.0, Culture=neutral, PublicKeyToken=b03f5f7f11d50a3a"
connectionStringName="adconn"
enableSearchMethods="true"
attributeMapUsername="sAMAccountName" />
</providers>
</membership>
NOTE: This
one is a bit different. In the web application’s web.config file
search for “<membership” (without “”).
You will find there’s
already a membership and role provider plugged in (shown in Image4).
SPClaimsAuthMembershipProvider & SPClaimsAuthRoleProvider in
Microsoft.SharePoint.Administration. Claims implements the default
claims provider and Windows authentication type is plugged in through
HTTPModule (shown in Image5).


Now, we will plug in our
Active Directory membership provider to this by adding our provider
entry shown above to the <providers> element (shown in Image4).
The result should look like Image6.

Save and close this
web.config file.
STS Application web.config
changes
The next thing to do is to get your provider
entry in the STS application’s web.config file. Open Internet
Information Services (IIS) Manager on your SharePoint 2010 box. And
find the STS application (shown in Image7).

Right-click > Explore
to open the files within this application in explorer.
You
should now be in this path: C:\Program Files\Common Files\Microsoft
Shared\Web Server Extensions\14\WebServices\SecurityToken. And you will
find a web.config file in there. That’s the Security Token Service
Application’s web.config you need to add your provider and connection
information to.
Open this web.config file. If this is the first
time you are configuring claims, you’ll not find
<system.web></system.web> section in it. That’s not a
problem, just add that section yourself. What works out for me, is to
go to the end of this web.config file and do the following:
First
add the connection information just before </configuration>. And
then after the <connectionStrings></connectionStrings>
section, add a <system.web></system.web> section and add our
provider information into it. The result should look like Image8.

After this doing an
IISRESET might be a good idea.
You are good now with regards to
web.config file entries. Now you have to get some configuration done
through UI to wire-up our provider to the web application. First, go to
the Web Applications Management page in Central Administration site,
click the web application you want to enable FBA claims on and choose
Authentication Providers from the ribbon. From the Authentication
Providers dialog, choose Default. Scroll a bit down to find Identity
Providers section. Check Enable ASP.NET Membership and Role Provider
(NOTE: You can also do this at the time of creating this web
application) and type in the name of your provider. In my case, it is
admembers. After you do this, UI should like Image9. Hit Save.
Close
the Authentication Providers Dialog UI.

Now, hit User Policy
ribbon option in the Web Applications Management page having selected
your web application. Hit Add Users in the Policy for Web Application
dialog. Hit Next in Add Users dialog. Use the Browse button in the
Choose Users people picker control. Notice the Select People and Groups
dialog that comes up is changed. Noticeable difference is that there
are sections like Active Directory, All Users, Forms Auth &
Organizations. Type in an active directory user alias and search.
There should be 2 results for the same user. One identified through
NTLM authentication and the other through FBA Claims authentication
that’s using Active Directory membership provider (refer Image10).
Select the user from
Forms Auth result. In my case, it’s the first user displayed in
Image10. Hit Add and then OK in the Select People and Groups dialog.
In the Add Users dialog, check Full Control - Has full control for the
Choose Permissions section and hit Finish. NOTE: If you want to
provide full control to other users either from FBA Claims
authentication or NTLM authentication, you can do that here.
Now,
your Policy for Web Application dialog should look like Image11. Hit
OK.

Now, you can create your
top-level site collection in this web application. Click Application
Management from the left navigation in Central Administration site.
Click Create Site Collections. Ensure that your web application plugged
in with FBA Claims is selected in the Web Applications drop-down.
Provide a title, description and pick up a template of your choice. In
the Primary Site Collection Administrator section, type in the alias of
the site collection administrator. This should be the NTLM
authenticated user. The entries should look like Image12. Hit OK to
create the site collection.

Once the site
collection is created, browse to it. A page as shown in Image13 will be
displayed.

Choose Windows
Authentication from the drop-down and you’ll log into the newly created
site collection using Windows Authentication. Now, you need to add
another site collection administrator. But this must be from the active
directory membership provider. You can login through forms
authentication using the user you added with full control in user policy
settings above. If you choose to not do that (which most customers
do), you can do one of the following steps to add another site
collection administrator to this FBA Claims Authentication enabled site.
- Go to Central Administration site > Application Management from left navigation > Change site collection administrators > add the alias of the user from FBA Claims Authentication as the secondary site collection administrator and click the Check Names button to resolve it.
- Login to the Claims Authentication enabled site using Windows Authentication. Site Actions > Site Settings > Site collection administrators > type the alias of the user from FBA Claims Authentication in the Site Collection Administrators and click the Check Names button to resolve it. This is shown in Image 14.

After this, you should
be able to login to this site using the same URL with both Windows and
Forms Authentication (Forms Authentication login shown in Image15)
WARNING: Take utmost care when making the web.config file
entries because that’s where thing go wrong. And if it does,
identifying and fixing it might be a herculean task – trust me :)
Where is SharePoint web.config
There is a separate web.config file for each Web Application / IIS
Website which is running an instance of SharePoint. For example, if
Sharepoint, Central Admin and the MySite host are all running as
separate Web applications (different Application pools) on separate IIS
sites, there will be a web.config file in the root of the virtual
directory for each application. There is also a separate web.config file
which contains configuration details for the “_layouts”, “_catalogs”,
etc directories of SharePoint sites.
You should not make changes to the web.config file in a production
environment, or while in production. Back up your entire SharePoint
environment, including all databases prior to commencing any major
troubleshooting or configuration changes. You should attempt and test
any modifications to the web.config file in a non-production environment
which is configured the same as the live environment. Once you are
confident the the changes apply the necessary changes if required to the
live environment while it is not in use. The IIS Website will
automatically reset when the web.config file is saved so changes will be
applied immediately. Be sure that you have not left syntax or any other
errors in the file before saving changes.
The web.config files are genearally found in the following
locations:
- web.config file in the root folder of each virtual server / IIS Application.
Local_Drive:\Inetpub\wwwroot
This is the usually the file that contains most of the web
configuration of a SharePoint site collection. To display full errors
you would need to modify this web.config file. There may be one for each
of the SharePoint applications running in some cases (MySites, Multiple
Portals or Instances of SharePoint, Central Admin, etc.). If this is
the case, you will only need to modify the web.config file which is in
the root of the virtual directory for the instance of SharePoint which
you using. To find out which directory is used by various SharePoint
applications/websites, view the properties of the SharePoint website in
IIS and from the “Home Directory” tab, the value in the “Local path”
field will take you to the directory where the web.config file is for
the specific instance of SharePoint / Application in IIS.- web.config file used in Web Part resources for the Global Assembly Cache (GAC)
Local_Drive:\Program Files\Common Files\Microsoft Shared\Web
Server Extensions\wpresources
- web.config configuration file(s) for extending other virtual servers
Local_Drive:\Program Files\Common Files\Microsoft
Shared\Web Server Extensions\60\CONFIG
- web.config file which defines configuration settings for the /_vti_bin virtual directory
Local_Drive:\Program Files\Common Files\Microsoft
Shared\Web Server Extensions\60\ISAPI
- web.config file which defines configuration settings for the /_layouts virtual directory
Local_Drive:\Program Files\Common Files\Microsoft
Shared\Web Server Extensions\60\TEMPLATE\LAYOUTS
- web.config configuration file for Central Administration pages.
Local_Drive:\Program Files\Common Files\Microsoft
Shared\Web Server Extensions\60\TEMPLATE\ADMIN\Locale_ID
Tuesday, 24 April 2012
Beautiful point on document library in SharePoint 2010
Here we will see what will happen when we create a list
or a document library inside a site. You may create a list using the browser or you
may create a list using SharePoint 2010 server object model.
Here it is:
Whenever
you will create a document library SharePoint creates a folder with
same name as the document
library at the root of the web site.
Then
it creates another folder with name Forms. And SharePoint creates a set
of site pages like DispForm.aspx,
EditForm.aspx, AllItems.aspx, and Upload.aspx inside the Forms folder.
This pages are required to add
and manage content for that document library.
This site pages
can be accessible using SharePoint object model using the SPFile class
like below:
SPWeb site = SPContext.Current.Web;
SPFile sitepageAllItems = site.GetFile("[Document Library
Folder Name]/Forms/AllItems.aspx");
SPFile class has
different methods like Delete, MoveTo, CopyTo methods to work with site
pages. Suppose by using
Delete method you can delete the site page from the site.
Application Pages in SharePoint 2010
Application pages in SharePoint 2010 is a very useful
concepts.
-These pages will be available to all sites of a farm.
-They are
deployed under C:\Program Files\Common Files\Microsoft Shared\Web Server
Extensions\14\TEMPLATE\LAYOUTS folder.
-They are
available through a virtual directory namely _layout.
-These pages
are basically for administrative tasks.
-To create an
application page using Visual Studio 2010 is very easy. By using the
template Application Page you can create an application page.
-By default the
page will use the default.master page.
-The page is
derived from the base class LayoutsPageBase which is derived from
Microsoft.SharePoint.WebControls namespace.
-Application
pages cannot be personalized or customized by the end user because they
are defined on the file system.
-Example of application page is settings.aspx.
Save site as template is not appearing for publishing sites
Introduction:
Here we will discuss how save site as template option is
not appearing in a publishing site but it appears for team site in
SharePoint 2010.
Description:
"Save site as template" is a very good option in
SharePoint. By using this you will create a site by using this template.
If you will go to Site Actions -> Site Settings and
in the Site Settings page under the Site Settings you will able to see
Save site as template option.
If you will open a team site and go to Site Actions
-> Site Settings. This will open the Site Settings page. In this page
under the Site Settings section you will see Save site as Template
option as shown in the figure below.

But if you will check the above step in a
publishing site then that Save site as template option will not be available. you can also check the
figure below.

I did not find the exact reason of this but to overcome the
situation Turn off the publishing feature and then try opening the Site Actions
-> Site Settings and in the Site Settings page under the Site Settings, now you will see the link "Save
site as template."
Disadvantages of external lists in BCS
-Approval of items is not supported.
-Attachments
are not supported directly.
-Check-in and checkout of items are not
supported.
-Using standard site content types in External
Lists is not supported.
-Drafts of items are not supported.
-Send-To
operations are not supported.
-List event handlers are not supported.
-Datasheet
View is not supported.
-Querying through LINQ to SharePoint is not
supported.
-Document templates are not supported.
-Versioning
of items is not supported.
-Starting workflows from items is not supported,
but workflows can read or write to External Lists through the SPList
object.
-Validation formulas are not supported.
Export Import option in SharePoint 2010
Though SharePoint 2010 provides an option for export
where SharePoint 2010 allows you to export websites and lists and also
an import option, where a user can import a site or a list.
Export:
You can use central administration,
stsadm or powershell to export a site or a list.
Stsadm:
STSADM -o export -url <url> -filename
<filename>
There are also
lots of optional parameters are available.
PowerShell:
Export-SPWeb <url> -path
<filename>
There are also
lots of optional parameters are available.
Still it has
some limitations for which we should use backup rather than export.
Limitations
of Export:
- Export is just
like copy a web site.
- But here are some characterstics that export will not
keep like Settings not preserved are workflow associations and instances, file check-out status,
alert subscriptions, tags and notes, and personal Web part settings.
- It takes long time and place a large burden on your
farm.
- Microsoft is recommending not to export more than 1 GB.
Import:
You can use stsadm or powershell to import a web site or
a list. But to import a site first the top level site should be created
with the matching site defination (like team site or blank site etc)
and also no content need to be there.
SharePoint
will create the child web sites automatically, but top level site needs
to be created before import.
If
you are importing a list, if the lists exists then it must be the same
template. If the list does not exists SharePoint will create.
Stsadm
command:
STSADM
-o import -url <url> -filename <filename>
There are also lots of optional parameters are
available.
PowerShell commad:
Import-SPWeb <url> -Path
<filename>
There are also
lots of optional parameters are available.
SharePoint 2010 object model classes
Here there are some SharePoint
Object model classes.
In the top SPFarm class is there.
SPFarm: This reference the
entire SharePoint Server Farm.
By using this you can create a
new farm or you can connect to a existing a existing farm.
Namespace:
Microsoft.SharePoint.Administration
SPServer: By using this
class you can browse through the collections of servers belongs to the
Farm.
SPSite: Represent a Site
collection.
SPWeb: Represent a web site.
SPUserToken: The
SPUserToken class represents a token for a valid SharePoint user.
SPList: SPList corresponds
to a single list instance, whether that is a list of items or a
document library.
SPListItem: This defines a reference to a specific
item of a list.
SPDocumentLibrary: This type represents a document
library.
SPFile: This class is
used to enumerate the files contained in a document library.
SPPrincipal: This class is
the parent class for SPGroup and SPUser.
SPControl: This class we
need while developing web controls or Web Parts.
SPContext: This is a very
useful class and it has some direct methods to access useful information
about current requests.
SPContext class in SharePoint 2010
- Represents the context of an HTTP request in Microsoft
SharePoint Foundation.
- This class also available in SharePoint Sandboxed
solution also.
- Present in the Assembly Microsoft.SharePoint.dll.
- This class
returns current information about list, site and also site collection,
also you can retrieve current user name also.
- Here are
some example of SPContext class
string
userLoginName=SPContext.Current.Web.CurrentUser.LoginName; //This will
return current login name.
SPList currentList = SPContext.Current.List; //Give
you the current list associated with the context
SPWeb
currentWeb = SPContext.Current.Web; //Returns the current site
associated with the context
SPSite currentSite = SPContext.Current.Site; //Returns
current site collection associated with the context
SPWebApplication currentWebApplication =
SPContext.Current.Site.WebApplication; //Returns current web application
associated with the context.
SPContext.Current.SiteFeatures
//Give you the activated site collection features of the SharePoint
context.
You can check more on msdn in this URL: http://msdn.microsoft.com/en-us/library/microsoft.sharepoint.spcontext.aspx
Event receivers in sharepoint 2010
Through this article I am trying to explain about event
receivers in SharePoint.
An event receiver is a class that contains one or more
methods known as event handlers that are executed automatically by
SharePoint in response to events such as adding item to a list.
You can use event handlers for data validation, data
integrity etc.
SharePoint categories events into of two types 1. Before
events (synchronous events) 2. After events (asynchronous events).
1. Before
events (synchronous events):
These events fires before an action occurs and before
SharePoint has written any data to the content database.
For example ItemAdding event will fire when trying to
add an item to a list. These events does support cancelling of event
action. These events are always end with 'ing' like FieldAdding,
ItemAdding, ItemUpdating, WebAdding, WebDeleting etc. These events are
also know as synchronous events.
2. After events (asynchronous events):
These events
fire after the event action has completed and after SharePoint
Foundation has written to the content database to commit the event
action. These events does not support cancelling of event action. These
events does support cancelling of event action. These events are always
end with 'ed' like FieldAdded, ItemAdded, ItemUpdated, WebAdded,
WebDeleted etc. These events are also know as asynchronous events.
Events,
Event Receivers & Object Model:
Event
receivers are nothing but custom classes which are derived from event
receiver base classes that are defined by Microsoft in
Microsoft.SharePoint assembly.
Some of the base classes are
SPItemEventReceiver: There are related to SharePoint
items.
SPListEventReceiver:
Related to lists.
SPWebEventReceiver:
Related to webs.
SPWorkflowEventReceiver:
Related to workflows instances. etc.
Remember all
these classes(except SPEmailEventReceiver and SPFeatureReceiver) are
derived from a common base class know as SPEventReceiverBase.
Here there
are different event receivers:
Item-Level
Event Receivers:
The base class for this type of event receivers are
SPItemEventReceiver and are related to SPListItem instances.
Some events
are: ItemAdded, ItemAdding, ItemCheckedIn, ItemCheckingIn,
ItemCheckedOut, ItemCheckingOut, ItemDeleted, ItemDeleting etc.
List-Level
Event Receivers:
The base class for this type of event receivers are
SPListEventReceiver and events are related to lists. These events fires
whenever any changes to the fields of an existing list as well as adding
or deleting list instances.
Some events are: FieldAdded, FieldAdding, FieldDeleted,
FieldDeleting, FieldUpdated, FieldUpdating, ListAdded, ListAdding,
ListDeleted, ListDeleting etc.
Web-Level Event Receivers:
These
are events related to Site Collection deletion and website creation,
deletion, moving, and provisioning. The base class for these type of
event receiver is SPWebEventReceiver.
Some events
are: SiteDeleted, SiteDeleting, WebAdding, WebDeleted, WebDeleting,
WebProvisioned etc.
Workflow Event Receivers:
These
event receivers are for running workflows and the base class for these
type of event receivers are: SPWorkflowEventReceiver.
Some events
are: WorkflowStarting, WorkflowStarted, WorkflowCompleted etc.
E-Mail
Event Receivers:
These event receivers are for e-mail–enabled list
instances and the base class is SPEmailEventReceiver.
For this type of event receivers you have to override
the EmailReceived method.
Tuesday, 17 April 2012
SharePoint 2010: Add Colors, Borders and Fonts to Web Parts
6/04/2011
SharePoint 2010: Add Colors, Borders and Fonts to Web Parts
In October of last year I wrote an article on changing the color, borders and fonts for SharePoint 2007 web parts. Here (finally) I will do the same for SharePoint 2010 web parts. The previous article used JavaScript to make these changes while this one will use CSS.A 2007 version of this article is here.
Do you want to change all web parts in all pages, all web parts in a single page or just one web part? Each of these will require a slightly different approach.
- All web parts in all pages?
Add the CSS to the master page, either inline or linked to a file - All web parts in a single page?
Add the CSS to the page using SharePoint Designer or a Content Editor Web Part
(If using a CEWP, add the web part below the web parts to change, i.e. last zone, last web part) - Just one web part?
Add the CSS as for a single page, but prefix all of the CSS entries with the ID of the web part to change
To use the sample CSS below for all web parts, remove all of the “#MSOZoneCell_WebPartWPQ5” references.
A Web Part
Here is a terribly abused web part :-) that has an exaggerated set of colors and fonts to make each areastand out.
![[image%255B5%255D.png]](https://blogger.googleusercontent.com/img/b/R29vZ2xl/AVvXsEjWnt3TfMZYpumomS8cstawDsCYsw0k5_4nK3AMGRkhNUldHFqxzZXkyEFz7U-m7CAWos6LqII_t3Wqv0-d0H4r0OfkVn2g7bKqoTILOtdFkiUJ9c2_oytSTlgLpmvQ0RmlyiL6Ee4detih/s1600/image%25255B5%25255D.png)
The CSS
Notes:- You don’t need to use all of the CSS. Pick and choose as needed.
- This is not a complete list of what you can change in a web part. Search the HTML source of your web part page for ideas, or do a web search to see what others are doing.
- “#MSOZoneCell_WebPartWPQ5” is the ID of a single web part to change. This is only need when changing a single web part on a single page. Your web part will have a similar ID, but with a different number.
- The number in the web part ID may change if the web part is moved on the page.
- “#MSOZoneCell_WebPartWPQ5.ms…” vs “#MSOZoneCell_WebPartWPQ5<space>.ms…”
The space is used to indicate a parent-child relationship. With the space, CSS looks for an element with an ID of “#MSOZoneCell_WebPartWPQ5” and then looks for a child element with a class name of “ms…”. Without the space, CSS looks for single element that has both the ID and the class name. - Anywhere there is a background property you can also set a background image by using:
background-image:url(' someimagepath '); - Colors can be set using color names (“green”) and color numbers (“#00FF00”)
- The .ms-wpTdSpace class name is used to identify the corners or ends of the web part’s title area. If you don’t define anything for these they stay hidden. See the links at the end of this article for ideas for taking advantage of these corner areas. (How about rounded tab-like corners!)
- <style type="text/css">
/* === Title bar CSS === */
/* TR - title bar for web part */
#MSOZoneCell_WebPartWPQ5 .ms-WPHeader
{
background-color:green;
}
/* H3 - Text in title bar of web part */
#MSOZoneCell_WebPartWPQ5 .ms-WPTitle a
{
color:white;
font-family:"Comic Sans MS";
font-size:24pt;
}
/* TD - far left and far right (corner) cells of title bar - useful for round corner tricks */
#MSOZoneCell_WebPartWPQ5 .ms-wpTdSpace
{
/* background-image:url(' someimagepath '); */
width:30px !important;
background-color:red;
}
/* web part check box */
#MSOZoneCell_WebPartWPQ5 .ms-WPHeaderCbxHidden
{
display:none;
}
/* === Web part background CSS === */
/* TD - background for all but title bar of web part */
#MSOZoneCell_WebPartWPQ5.s4-wpcell
{
background-color:lightgreen;
/* border-style:dashed; */
border-style:dashed;
border-width:5px;
}
/* TD - paging area (i.e. 1 - 5) */ #MSOZoneCell_WebPartWPQ5 .ms-bottompaging td{ background-color:yellow !important;} /* hide the gray line above "add new" link */
#MSOZoneCell_WebPartWPQ5 .ms-partline
{
display:none;
}
/* selected (clicked) web part background */ #MSOZoneCell_WebPartWPQ5.s4-wpActive{ background-color:fuchsia; border-color:red; /* border-style:dotted; */
}
/* === Column headings === */
/* color for sortable column headings */
#MSOZoneCell_WebPartWPQ5 .ms-vh-div a
{
color:red !important;
}
/* color for non-sortable column headings */
#MSOZoneCell_WebPartWPQ5 .ms-vh-div
{
color:red !important;
}
/* === List text CSS === */
/* item description text */
#MSOZoneCell_WebPartWPQ5 .ms-vb2,
#MSOZoneCell_WebPartWPQ5 .ms-vb-user a,
#MSOZoneCell_WebPartWPQ5 .ms-vb-title a
{
color:yellow !important;
font-size:12pt;
}
/* TR - alternating (#2,#4,#6...) row of web part */
#MSOZoneCell_WebPartWPQ5 .ms-alternating
{
background-color:navy;
Wednesday, 11 April 2012
User Controls and Server Controls in SharePoint
User Controls
A user control is a control that is associated with a .ASCX extension and was originally intended for a developer to re-use within a single project. ASP.NET developers know it is really easy to create a new user control, drag and drop some controls onto a visual designer, put some logic in the control’s code-behind, and re-use the control within a single project. This is because the .ASCX file associated with the control enables you to create markup for your control:<%@ Assembly Name="$SharePoint.Project.AssemblyFullName$" %> <%@ Control Language="C#" AutoEventWireup="true" CodeBehind="EchoControl.ascx.cs" Inherits="ControlsDemo.ControlTemplates.ControlsDemo.EchoControl" %> Enter some text: <asp:TextBox ID="TextBox1" runat="server"></asp:TextBox> <asp:Button ID="Button1" runat="server" Text="Button" /> <asp:Label ID="Label1" runat="server" Visible="false"></asp:Label>Because you can add markup for your control, you get the nice WYSIWYG designers for your control. This allows you to drag items from the toolbox, such as a button, a label, and a text box.

Another nice feature of user controls is that you can quickly add event handlers for your control. For instance, I double-click the button to add some code-behind, and Visual Studio pops up the code editor to allow me to add some code.
using System;
using System.Web.UI;
using System.Web.UI.WebControls;

namespace ControlsDemo.ControlTemplates.ControlsDemo
{
    public partial class EchoControl : UserControl
    {
        protected void Button1_Click(object sender, EventArgs e)
        {
            Label1.Text = "You entered: " +
                TextBox1.Text + " at " +
                System.DateTime.Now.ToLongTimeString();
            Label1.Visible = true;
        }
    }
}
Notice that our code-behind derives from System.Web.UI.UserControl. For existing ASP.NET developers, you will be happy to see that it’s the same old UserControl class that’s been there since ASP.NET was introduced. By using the .ASCX, Visual Studio 2010 provides the same WYSIWYG, drag-and-drop features that you have with ASP.NET development. In your SharePoint 2010 project, add a new User Control to your project, add the markup to the .ASCX file, and put some code in the code-behind. The project structure will look like this:

When the solution is compiled, the code (the .cs classes) are compiled into an assembly that is deployed to the GAC. The ASCX file points to our assembly, which SharePoint deploys to the global assembly cache. SharePoint deploys your .ASCX file to a special location:
C:\Program Files\Common Files\Microsoft Shared\Web Server Extensions\14\TEMPLATE\CONTROLTEMPLATESIf you open that directory, you will see lots of out-of-box controls, such as Welcome.ascx, the control that is registered in the v4.master master page in SharePoint 2010. Once the control is deployed to the ControlTemplates directory structure, an end user can then use the control in their master page or page. For instance, we’ll use SharePoint Designer 2010 to edit a master page to use our control. At the top of the file, register the control:
<%@ Register TagPrefix="demo" TagName="EchoControl"
src="~/_controltemplates/ControlsDemo/EchoControl.ascx" %>
You can see where to do that in this screen shot:

Once our control is registered, we use it in our page, and the visual design is used in SharePoint Designer 2010 to give a WYSIWYG rendering to the end user.

We save the master page and then look at the final product:

User controls are a great way to add functionality to a SharePoint site for end users without requiring a web part. You might have noticed that Visual Studio 2010 includes a new project item template called “Visual Web Part”. This project simply creates a .ASCX control that is loaded by your web part.
Server Controls
A server control is a compiled control that renders on the server. Where user controls derive from System.Web.UI.UserControl, a server control (also known as a custom control) typically derives from System.Web.UI.WebControl. The main difference is that server controls do not have a corresponding .ASCX control. For some scenarios, this can be highly beneficial because the page parser does not need to parse the .ASCX control.Creating a server control is very easy. In Visual Studio 2010, add a new ASP.NET Server Control item to your project from the Web group.

The generated template is just a suggestion, you can edit the class to suit your needs. Here is a useful control for SharePoint developers that simply shows the name of the server that is currently processing the request.
using System;
using System.Web.UI.WebControls;
using System.Web.UI;

namespace ControlsDemo
{
    [ToolboxData("<{0}:ServerNameControl runat=server></{0}:ServerNameControl>")]
    public class ServerNameControl : WebControl
    {
        protected override void CreateChildControls()
        {
            Label l = new Label();
            l.Text = System.Environment.MachineName;
            Controls.Add(l);
        }
    }
}
This can be useful for troubleshooting inconsistent behavior among web front end servers in a load-balanced farm. When Visual Studio builds the project, the class is compiled into our assembly and deployed to the GAC. Once the control is registered in the GAC, we can use it in our master page similar to our previous example. The syntax is different, because before we could point the Src attribute to the .ASCX file, this time we need to register the control and import the namespace.
<%@ Register
    TagPrefix="demo2"
    Namespace="ControlsDemo"
    Assembly="ControlsDemo, Version=1.0.0.0, Culture=neutral, PublicKeyToken=01374ea14aa626aa" %>
<%@ Import Namespace="ControlsDemo" %>
Once we register the control, we can now use it in our page.
<demo:ServerNameControl runat="server" id="serverNameControl"/>Only this time, instead of seeing the nice WYSIWYG UI in SharePoint Designer 2010, we see an error message, “The type is not registered as safe.”

WTF?!?!
To understand what’s going on, you need to understand how the page is processed:
When a page with a user control is requested, the following occurs:[via http://support.microsoft.com/kb/893667]
- The page parser parses the .ascx file specified in the Src attribute in the @ Register directive and generates a class that derives from the System.Web.UI.UserControl class.
- The parser then dynamically compiles the class into an assembly.
- If you are using Visual Studio, then at design time only, Visual Studio creates a code behind file for the user control, and the file is precompiled by the designer itself.
- Finally, the class for the user control, which is generated through the process of dynamic code generation and compilation, includes the code for the code behind file (.ascx.cs) as well as the code written inside the .ascx file.
The page parser will parse the page and determine if the page uses code-behind or includes in-line script. I have blogged about the impact of marking your controls as safe for pages here and here, which gives some insight to the problem. The reason that our user control example worked is because it was deployed to the ControlTemplates directory, an action that only a farm administrator would have privileges to do. Thus, any control in the ControlTemplates directory structure is marked as safe out of the box:
<SafeControl Src="~/_controltemplates/*"
                   IncludeSubFolders="True"
                   Safe="True"
                   AllowRemoteDesigner="True"
                   SafeAgainstScript="True" />
The server control does not have a corresponding .ASCX file, so we need to explicitly mark it as safe. Visual Studio 2010 makes this very easy. Add a new Module to your project and give it a name.

Click the module in the Solution Explorer pane, and edit the Safe Controls property. Add a new safe control, taking care to add the right namespace. You can use an asterisk for the typename if any type in the namespace is safe, or you can use the class name of a specific class that is safe as I did here:

You can delete the sample text file that is generated. Now, when we look at the web.config file, we see a SafeControl entry for our control:
<SafeControl Assembly="ControlsDemo, Version=1.0.0.0, Culture=neutral, PublicKeyToken=01374ea14aa626aa"
                   Namespace="ControlsDemo"
                   TypeName="ServerNameControl"
                   Safe="True"
                   SafeAgainstScript="False" />
Now, when we use the control in SharePoint Designer 2010, we have the markup correct but see nothing in the WYSIWYG view:

If we view the page in the browser, we can see the effect of the control being rendered (highlighted in yellow to show you where the server name is rendered).

You can do some amazing things with ASP.NET controls, and you can bring many of your existing controls forward so that end users can take advantage of them in their pages and master pages.
Monday, 9 April 2012
HOWTO: Create an Event Handler for SharePoint(MOSS 2007)
As I see this question popping up on many forums, I thought it would be time to write a tutorial about it, even though there are already quite a few of them handling the subject.
Prerequisites:
- Visual Studio 2008
- Visual Studio 2008 SharePoint Extensions 1.2
- WSP Builder (http://www.codeplex.com/wspbuilder)
How-to Create an Event Handler by making use of a feature:
To start with : what exactly is an event handler for SharePoint? It’s a piece of code that is triggered when something (an event!) happens. When that happens, our event handler can replace what is supposed to happen with our own code. How do we build that in Visual Studio (using WSP Builder)?
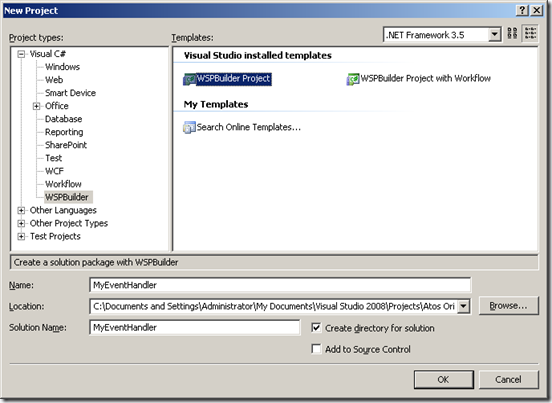
First of all, we will be creating a WSP Builder Project called MyEventHandler:
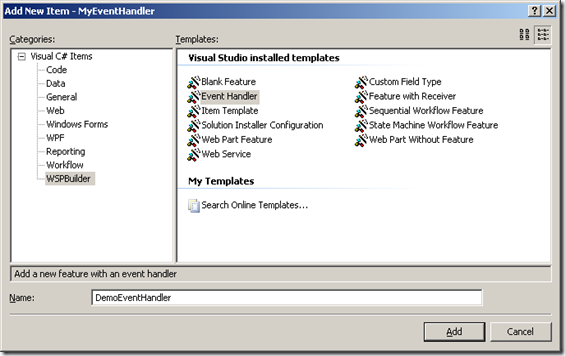
Once the project is created, we will right-click the project and select add new item. In the left column, select WSPBuilder and select Event Handler in the template list. In the name field I chose to call it DemoEventHandler.
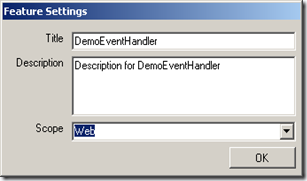
You’ll get a new screen where you can define the scope of the feature. You can leave it at Web
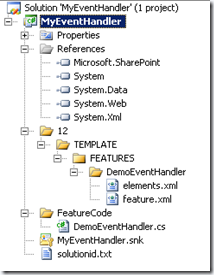
After this step your project will have three additional files added to it and a few folders:
feature.xml: the CAML based declaration of your feature.
elements.xml: the CAML based declaration of the element(s) in your feature, which is your event handler in this case.
DemoEventHandler.cs : the code that will be overriding the existing SharePoint Event Handlers.
Let’s take a look at our feature.xml code:
elements.xml: the CAML based declaration of the element(s) in your feature, which is your event handler in this case.
DemoEventHandler.cs : the code that will be overriding the existing SharePoint Event Handlers.
Let’s take a look at our feature.xml code:
<?xml version=“1.0“ encoding=“utf-8“?><Feature Id=“875e92bb-782c-40b4-a5a9-f55423df667e”Title=“DemoEventHandler”Description=“Description for DemoEventHandler”Version=“12.0.0.0”Hidden=“FALSE”Scope=“Web”DefaultResourceFile=“core”xmlns=“http://schemas.microsoft.com/sharepoint/“><ElementManifests><ElementManifest Location=“elements.xml“/></ElementManifests></Feature>
What this file does is identify the feature for SharePoint (Id), give it a title and description (which will be shown on the feature activation site), define a scope (where Web means site, where Site means Site Collection and then there is Web Application and Farm as possible scopes.
Another important part of the feature is the <ElementManifests> area. That area defines all the items that make part of the feature while the manifests themselves describe that specific part. As it is here the case with the event handler:
Another important part of the feature is the <ElementManifests> area. That area defines all the items that make part of the feature while the manifests themselves describe that specific part. As it is here the case with the event handler:
<?xml version=“1.0“ encoding=“utf-8“ ?><Elements xmlns=“http://schemas.microsoft.com/sharepoint/“><Receivers ListTemplateId=“100“><Receiver><Name>AddingEventHandler</Name><Type>ItemAdding</Type><SequenceNumber>10000</SequenceNumber><Assembly>MyEventHandler, Version=1.0.0.0, Culture=neutral, PublicKeyToken=ca176e059473d6b1</Assembly><Class>MyEventHandler.DemoEventHandler</Class><Data></Data><Filter></Filter></Receiver></Receivers></Elements>
What is important for us? First of all the ListTemplateId. The ListTemplateId defines to which List Types the Event Handler will be targeting. The table here below shows which list types there are available in SharePoint 2007:
| ID | Name |
| 100 | Generic list |
| 101 | Document library |
| 102 | Survey |
| 103 | Links list |
| 104 | Announcements list |
| 105 | Contacts list |
| 106 | Events list |
| 107 | Tasks list |
| 108 | Discussion board |
| 109 | Picture library |
| 110 | Data sources |
| 111 | Site template gallery |
| 112 | User Information list |
| 113 | Web Part gallery |
| 114 | List template gallery |
| 115 | XML Form library |
| 116 | Master pages gallery |
| 117 | No-Code Workflows |
| 118 | Custom Workflow Process |
| 119 | Wiki Page library |
| 120 | Custom grid for a list |
| 130 | Data Connection library |
| 140 | Workflow History |
| 150 | Gantt Tasks list |
| 200 | Meeting Series list |
| 201 | Meeting Agenda list |
| 202 | Meeting Attendees list |
| 204 | Meeting Decisions list |
| 207 | Meeting Objectives list |
| 210 | Meeting text box |
| 211 | Meeting Things To Bring list |
| 212 | Meeting Workspace Pages list |
| 300 | Portal Sites list |
| 301 | Blog Posts list |
| 302 | Blog Comments list |
| 303 | Blog Categories list |
| 1100 | Issue tracking |
| 1200 | Administrator tasks list |
| 2002 | Personal document library |
| 2003 | Private document library |
Once we have defined which list we are going to target we will define that we are overriding an ItemAdding event. ItemAdding means that the event will be fired right before the item is added to the list. This allows us to modify the item before it is saved to the list. The other parameters aren’t that important at the moment, apart from the Assembly and Class that will be linking to the assembly that contains the code of your event handler.
Possible events that you can override:
ItemAdded
ItemAdding
ItemAttachmentAdded
ItemAttachmentAdding
ItemAttachmentDeleted
ItemAttachmentDeleting
ItemCheckedIn
ItemCheckedOut
ItemCheckingIn
ItemCheckingOut
ItemDeleted
ItemDeleting
ItemFileConverted
ItemFileMoved
ItemFileMoving
ItemUncheckedOut
ItemUncheckingOut
ItemUpdated
ItemUpdating
Ok, so we checked out the feature.xml and the elements.xml, but there is also the DemoEventHandler.cs file. That contains the actual code of our event handler:
usingSystem;usingSystem.Collections.Generic;usingSystem.Text;usingMicrosoft.SharePoint;namespaceMyEventHandler{class DemoEventHandler : SPItemEventReceiver{public override void ItemAdded(SPItemEventProperties properties){base.ItemAdded(properties);}public override void ItemAdding(SPItemEventProperties properties){base.ItemAdding(properties);}public override void ItemUpdated(SPItemEventProperties properties){base.ItemUpdated(properties);}public override void ItemUpdating(SPItemEventProperties properties){base.ItemUpdating(properties);}}}
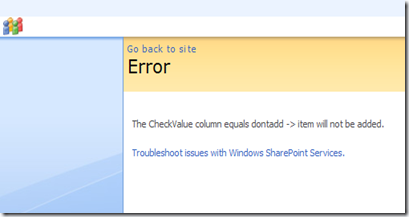
If you deploy it like this your event handler will run, but it will just call the base class and nothing special will happen. Let’s change the ItemAdding Event (as it is already defined in our CAML to be deployed). We will change the itemadding event so that it will check, when an item is being added, by making sure the CheckValue column does not contain the string “dontadd”. If it does contain dontadd, an error message is displayed and the item is NOT added to the list. To do this, we modify the ItemAdding Event to this:
public override void ItemAdding(SPItemEventProperties properties){if (properties.AfterProperties["CheckValue"].ToString() == “dontadd”){properties.ErrorMessage = string.Format(“The CheckValue column equals dontadd -> item will not be added.”);properties.Status = SPEventReceiverStatus.CancelWithError;properties.Cancel = true;}}
A little extra explanation. The AfterProperties contain the NEW values of an item. The BeforeProperties contain the OLD values of an item in case of an update. For an ItemAdding event the BeforeProperties are empty. What we do here is check the CheckValue properties value. If it contains “dontadd” we show the error message and by making use of properties.Status = SPEventReceiverStatus.CancelWithError we cancel the base.ItemAdding(properties) call. By adding properties.Cancel = true we cancel the Itemadding event.
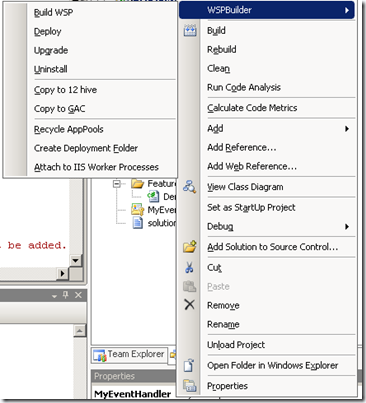
Ok, so now we built this, but how do we get this working on our SharePoint site? With WSPBuilder that is quite easy. Rightclick on your project, select WSPBuilder / Build WSP. This will create a solution file to be deployed on your SharePoint farm. Once that is done, select WSPBuilder / Deploy and the solution will be installed and deployed to your farm.
Ok, one thing to note here is that the event handler will be targeting all lists. This means that every list that does not contain the CheckValue column will no longer work. But checking if the column exists is something that you should be able to do yourself. Once it is deployed to your SharePoint farm, create a new Custom List and Add the column CheckValue of type text. Then go to Site Settings, Site Features (NOT Site Collection Features as the scope was Web) and activate our newly deployed feature:
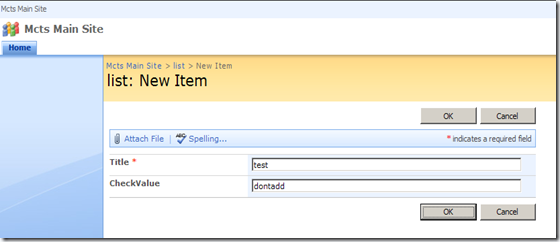
Ok, now we can test it by adding a new item with CheckValue equal to dontadd.
If you did everything according to plan, this is the information you should be receiving when you click ok:
Happy Coding!
In addition I added a few other interesting bits regarding Event Handlers
How-to Register an Event Handler through C# code:
The following code allows you to register an event handler by making use of code. RunWithElevatedPrivileges isn’t always necessary, but I added it to it so that you know that you can’t run the code in an application page as a user who doesn’t have the necessary rights.
SPSecurity.RunWithElevatedPrivileges(delegate(){impersonateweb.AllowUnsafeUpdates = true;_spListAanwezige.EventReceivers.Add(SPEventReceiverType.ItemAdded, “Namespace, Version=1.0.0.0, Culture=neutral, PublicKeyToken=61942ef99a051977″, “Namespace.EventClass”);_ impersonateweb.AllowUnsafeUpdates = false;});
How-to see if your event handler is deployed properly to the list:
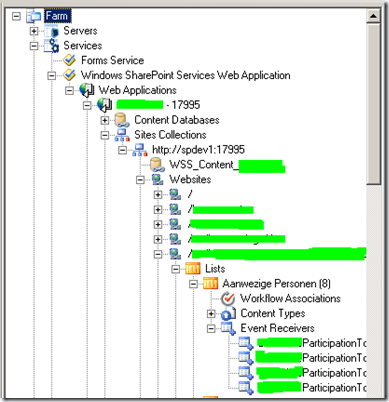
Out of the box SharePoint doesn’t display if your event handler is correctly hooked to a list. I make use of SharePoint Inspector(http://www.codeplex.com/spi) to check out my SharePoint Farm. To see if something is hooked to your list go to the following structure in your SharePoint Inspector to check out which events are registered to your list:
Subscribe to:
Posts (Atom)


